Sunday, December 30, 2007
Yellowbird's Broken Heart
During her 2007 annual airworthiness inspection, Yellowbird was diagnosed with a cracked engine crankcase. The treatment required removing the engine and shipping it to an engine shop in New York where it was rebuilt around a replacement crankcase. In the interim, Yellowbird sat in the corner of the FBO hangar while I treated her to a few upgrades and makeovers. There were delays and concerns aplenty, but after five months, she was finally restored to health. Here's the complete story of our grand misadventure:
- Cracked: This is where it all began. An otherwise trouble free annual inspection turns into a five month stay in the maintenance hangar.
- Enginectomy: What does it take to remove a typical light plane engine?
- Housework: Finding opportunity in adversity, I paint various airplane parts that were removed when the engine was pulled.
- SCAT: A kind of vocal improvisation common in jazz.
- Painting the Engine Room (Part 1, Part 2): The lower engine cowling gets a makeover.
- Bachelor Life: How to spend a lonely Friday night.
- It's Here!: After a month's delay, the rebuilt engine finally arrives.
- Parts: A shopping list of things replaced during the rebuild.
- Upgrades: Taking advantage of Yellowbird's disassembled condition, I order an engine monitor and preheater.
- It Flies! (sort of): The engine is hoisted aloft while the preheater is installed.
- Hanging the Engine (Day 1, Day 2, Day 3): Yellowbird comes back together.
- Delay, Again: One last gremlin rears its ugly head.
- First Run: Yellowbird sings for the first time in five months.
- The Annual Report - 2007: What did it take to restore Yellowbird to airworthiness?
- Leftovers: Paperweights, strange jewelry, and the Bachelor Pilot Table Setting.
- Aloft at Last: Yellowbird finally takes to the air!
Saturday, December 29, 2007
Aloft at Last
METAR KBMI 292056Z 22006KT 10SM OVC016 M01/M04 A3007 RMK AO2 56013 T10111038 SLP203
Translation: Wind: blowing from 220° at 6 knots; Visibility: 10 statue miles; Sky condition: overcast at 1,600 feet above ground level; Temperature: -1°C; Dewpoint: -4°C
Not the best conditions, and they were barely VFR, but it was worth a try just to get in the air again for our first flight after five months in the shop due to a cracked crankcase.
 After a bit of confusion during runup (I mistook the new mixture control for the prop control) I actually remembered how to takeoff and we were finally airborne. Break-in instructions call for running the engine at generally high power setting (above 65%) so as to seat the piston rings. I ran her at 23 inches of manifold pressure and 2,500 RPM, which under standard conditions would be roughly 75%. Cold temperatures typically mean higher performance for a given power setting, and although I don't know eaxctly how much that impacted the horsepower percentage, it was definitely reflected in the airspeed. In level flight, I was operating in the caution range (the yellow arc on the airspeed indicator, from 155 - 185 MPH) for much of the flight.
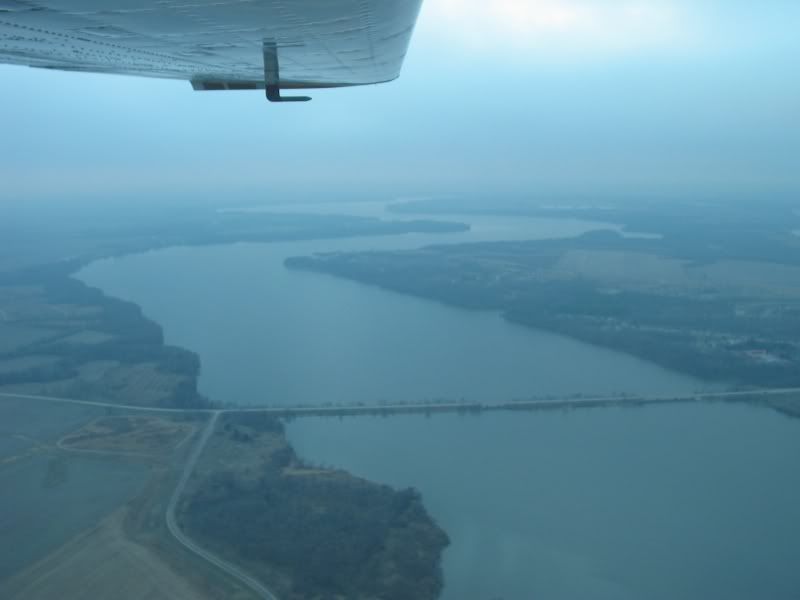
 It was pretty murky below the overcast, but as we continued around the area, the skies began to clear a bit and I found holes large enough to allow a peek above the cloud layer. I wouldn't wasn't to have to descend through those clouds - the layer wasn't that thick, but at a few degrees below freezing, ice would be a problem. I kept a careful eye on the hole.
 The engine monitor in action. Cylinder #3 is running a bit leaner than the other cylinders, but that is supposedly normal for this engine. What is curious is that the cylinder head temperature for #3, which typically runs hotter than the others, is significantly cooler. This may be due to the fact that #3 has a different type of temperature probe which allows the EDM-700 and the factory cylinder head temperature gauge to read from the same socket on the cylinder head. The numeric readout "23 IAT" is the carburetor inlet temperature. The manual indicates that this should read "CRB" instead of "IAT" (which stands for Induction Air Temperature, a measure of the temperature of air entering the intercooler of a supercharged engine) We had issues with the connectors of the wiring harness during installation of the EDM-700, so this may be another mismatched connector.
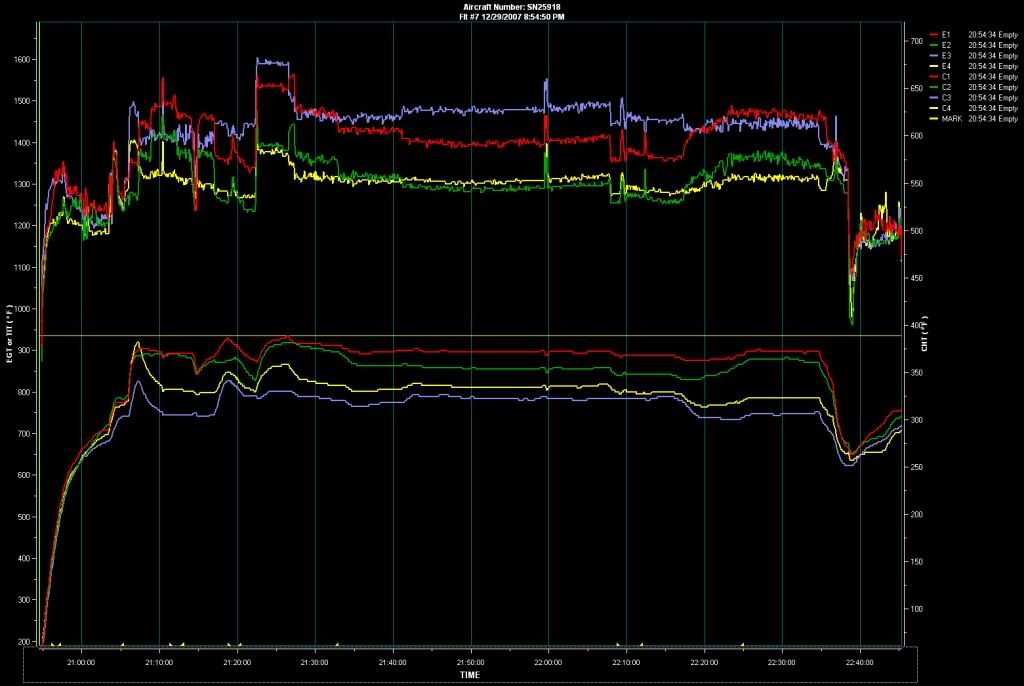 Here's the graph of the flight downloaded from the EDM-700 and displayed in JPI's EzTrends program. The top lines show the exhaust gas temperatures plotted against the y-axis scale on the left of the chart. The bottom lines show cylinder head temperatures plotted against the y-axis scale on the right. Flight events such as engine start and warm-up, takeoff and climb, level-off, landing, and the long taxi back to the ramp are evident. The major spikes in the EGT graph correspond to mixture adjustments I made while exploring the EDM-700's lean-find function, and a few in-flight magneto checks.
 After 2.3 hours in the air, it was time to come home again. I still remember how to land a Cardinal. It was basically a trouble free flight, and the only squawk (apart from the IAT/CRB readout) was an oil leak which was easily diagnosed and fixed.
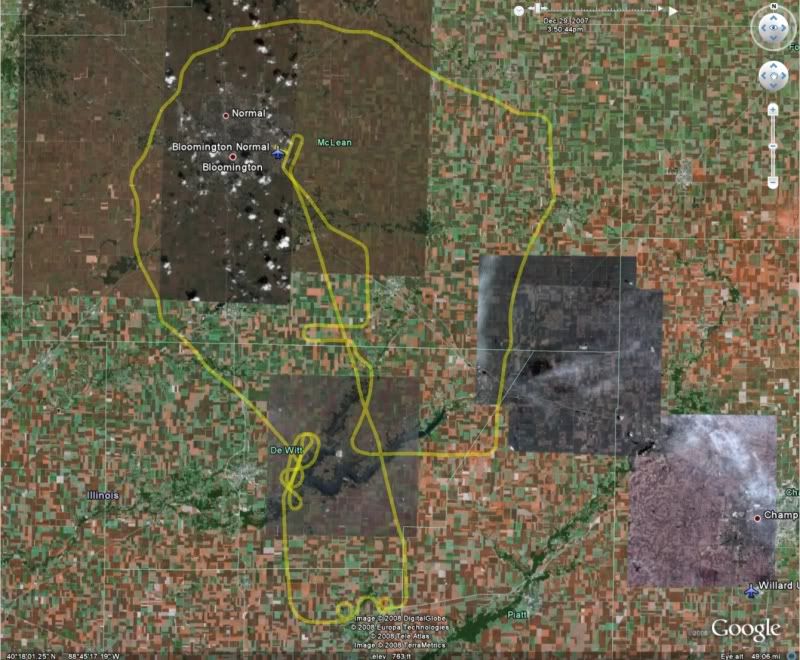 Here's where we went, according to the GPS track downloaded and shown in Google Earth.
Sunday, December 23, 2007
Leftovers
Yellowbird is whole again. After five long months sitting in a corner of the FBO hangar due to a cracked engine crankcase, she's finally fixed, reassembled, and signed off. Yesterday I paid the bill and picked up her keys and maintenance logs from the shop - now I just need to find a day with flyable weather. Until then, I have a box of assorted airplane refuse to dig through. This initially consisted of parts that were replaced when the engine was rebuilt. Added to the list as the process went on were various pieces that were replaced during the annual airworthiness inspection, and a few parts that were removed when I indulged in some convenient upgrades.
 The major upgrade was the replacement of the stock exhaust gas temperature gauge with a JPI EDM-700 digital engine monitor. The old gauge picked up the temperature from the exhaust of the #3 cylinder, hopefully giving the pilot a general idea of the combustion efficiency of the fuel air mixture. The EDM-700 tracks exhaust gas and cylinder head temperatures for all four cylinders as well as oil and carburetor temperatures, providing a much more comprehensive picture of the engine's operation condition. The old gauge was in working condition when removed, so I may offer it up on eBay.
 Also removed were the mixture control cable (top) and the engine oil pan heater (bottom. The mixture cable was replaced by a vernier type cable which allows more control when making fine adjustments. The oil pan heater was replaced by a complete Reiff preheater system which warms the oil as well as all four cylinders. I may put these up for sale also, but they may be harder to sell. The mixture cable would have a very narrow application - it's a standard Cessna part, but it's length may be suitable only for other Cardinals. The oil heater of uncertain origin (it was on the plane when I bought it, and there's no record in the logs of its installation) so it may not be suitable for reinstallation on a certified aircraft.
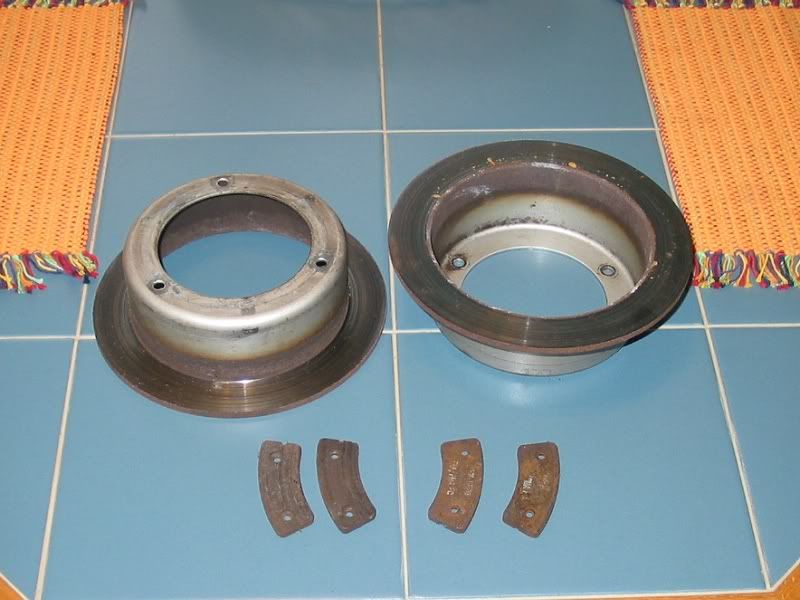 The brake disks and pads. These would go in the garbage, were it not for my strange desire to keep old airplane parts.
 When the engine was remounted, the rubber shock mounts were replaced. These enclose the bolts that attach the engine to the engine mount, and consist of a chewy rubber center surrounded by a hard outer sandwich of rubber and metal.
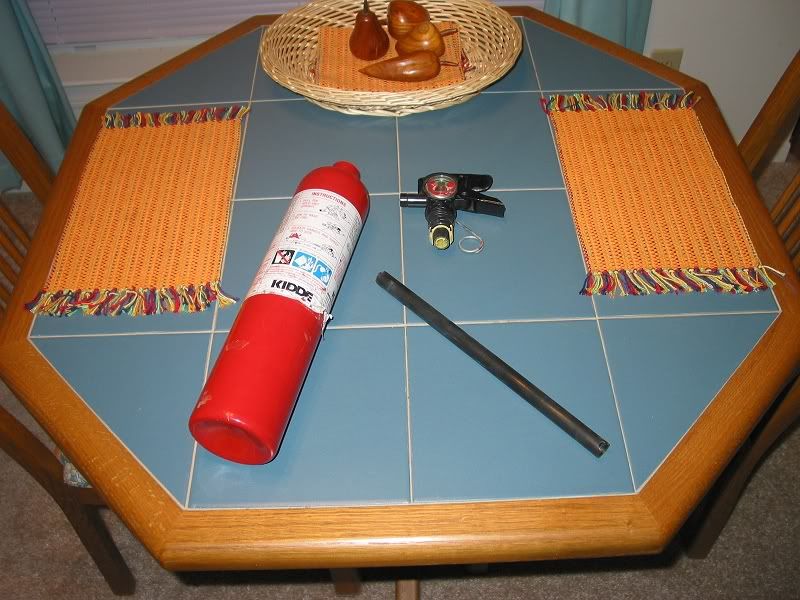 During the annual inspection, the fire extinguisher was found to have low pressure. I took it to be refilled, but the extinguisher folks recommended replacing it, since the valve was plastic and apparently prone to leakage. That turned out to be a good call - not only was it leaky, but it was broken. (The black tube is supposed to be part of the valve mechanism.) So, Yellowbird has a brand new fire extinguisher, and I have an absolutely useless broken one. Maybe I could make a lamp out of it...
The engine had been sent off to Mattituck for repair a cracked crankcase. The repair included a complete disassembly of the engine and inspection of each part before reassembling the engine around a replacement crankcase. Any parts that were defective were replaced. The old crankcase presumably was repaired and put back into circulation. Other lesser parts were boxed up and returned with the repaired engine.
 Here we have a crankshaft counterweight (left) and the four piston pins (right). The counterweight attaches to the crankshaft and helps dampen the vibrations of the engine. How it does so is a bit above my ability to visualize, but it apparently involves some of the same physics involved in the motion of pendulums. The piston pins connect the piston-bones to the connecting rod-bones. (Oh hear the word of the Lord!) These are all very impressive bits of metalworking, and quite hefty. They may make nice paperweights.
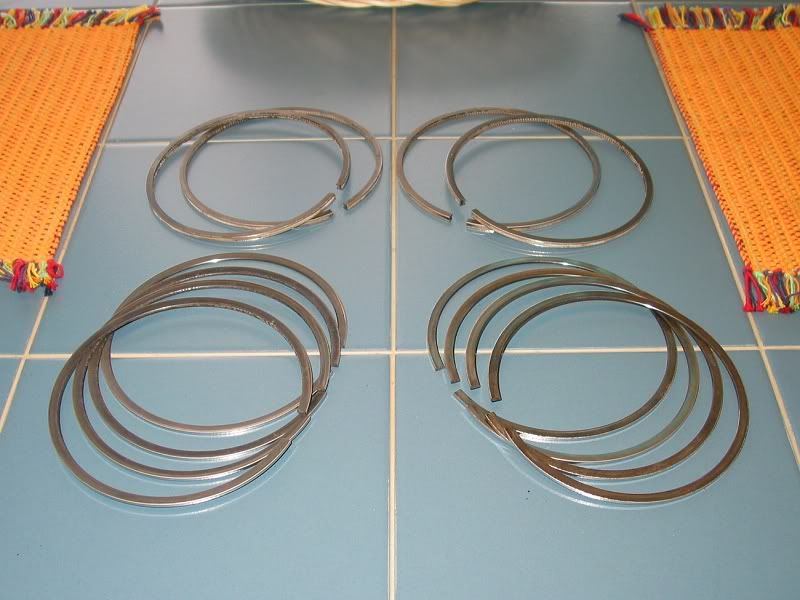 Piston rings. In the foreground are the eight compression rings. The ones on the right are clean and shiny on both sides. The ones on the left show carbon deposits on one side (barely visible in the photo). In the background are the oil control rings. Again, these are nice looking bits of metal, showing a lot of precision in their design. It would be a shame to throw them away, but I don't know what to make of them. They're a bit too large for napkin rings, but too small for that ring trick that magicians do. Bracelets, maybe?
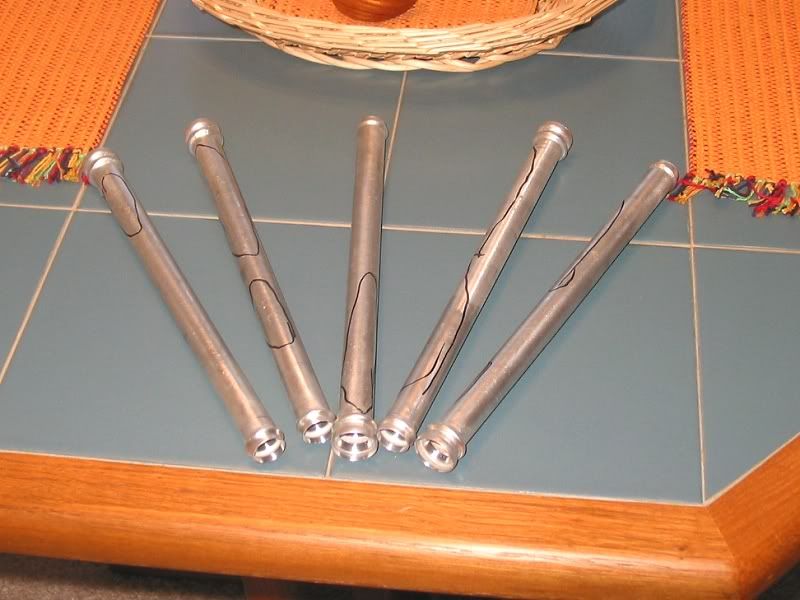 Five of the eight pushrod tubes were rejected due to surface corrosion (the faulty areas are marked in ink). If I clean them up, they might make nice candleholders.
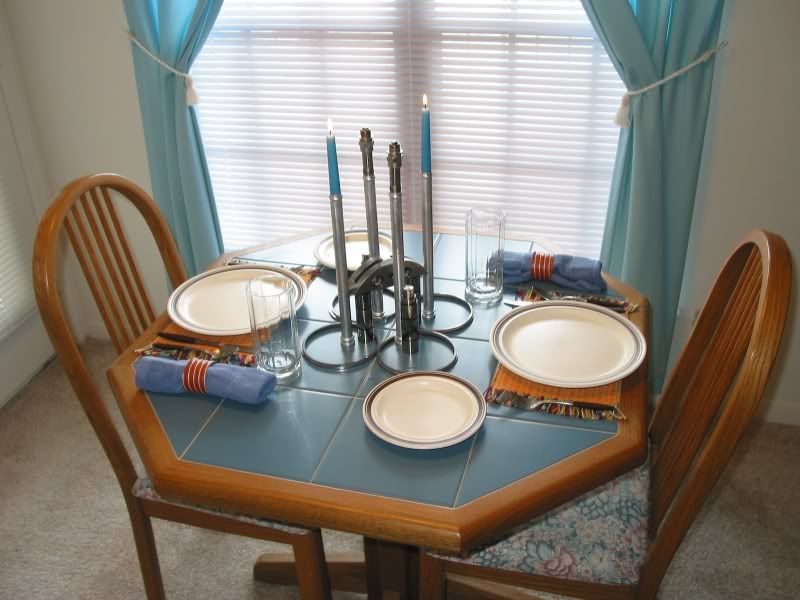 Candleholders and napkin rings have got me thinking: I now have an outdoor balcony where I can do airplane repairs, so the Bachelor Kitchen has mostly reverted to its original purpose. But that doesn't mean that I have to give up one of the benefits of bachelor pilot living, namely keeping airplane parts around the house. So, here you have it - the Bachelor Pilot Table Setting.
Saturday, December 22, 2007
The Annual Report - 2007
This year's annul airworthiness inspection goes down in the books as the most expensive misadventure in my aviating life so far. Yellowbird was due for inspection by the end of July, so I dropped her off at the shop towards the end of the month and waited for the results.
Initially, she seemed to be a healthy bird. A few discrepancies were noted and fixed:
- A worn alternator bracket and mounting bolt were replaced.
- The right forward engine baffle was reinforced and a support bracket fabricated to prevent the baffle from chafing against the alternator pulley.
- The ELT remote switch battery was replaced.
- The vacuum pump suction hose was replaced.
- Both brake rotors and pads were replaced.
- The faulty alternator warning light was replaced.
But, things took a turn for the worse when the mechanic took me into the shop and showed me the cracked crankcase. This kicked off a months-long process that included:
- removing the engine, shipping it off to Mattituck for repair, and reinstalling it after it was rebuilt
- cleaning and painting the engine mount
- replacing all four engine shock mounts
While she was grounded, I decided to take advantage of her disassembled condition and had a few upgrades installed:
- A JPI EDM-700 engine monitor
- A Reiff oil pan/cylinder preheat system
- A vernier mixture control cable
And to keep myself occupied, I took on a few airplane improvement projects:
- The engine baffles were cleaned and painted.
- The propeller spinner and bulkhead were stripped, cleaned and repainted.
- The lower engine cowling was cleaned and repainted.
- The paint on the upper engine cowling was touched up.
- All engine compartment SCAT ducting was replaced.
- The nosewheel pant was repainted.
Once all was done, it was December and time for the 24 month static system/transponder check. The altitude encoder failed and was replaced.
In all, Yellowbird was in the shop for five months. It wasn't cheap, but at least she's airworthy again.
The final bill? (Not for the faint of heart)
Wednesday, December 19, 2007
First Run
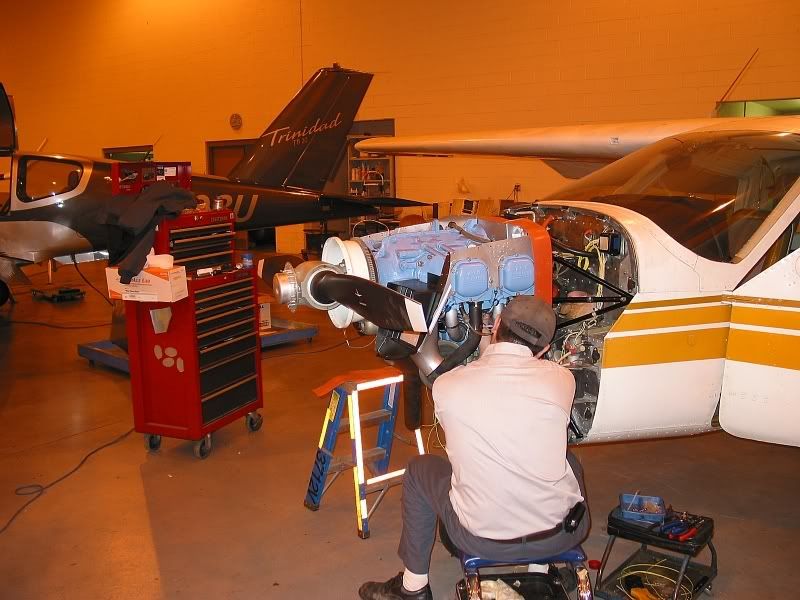
Today's the day, almost. She's fully reassembled and the weather is conducive to bringing her out to ground run the engine. The engine was run in a test cell at Mattituck after it was rebuilt, but this is the first time that it's been run since being reinstalled. I managed to get away from work for an hour or so to watch
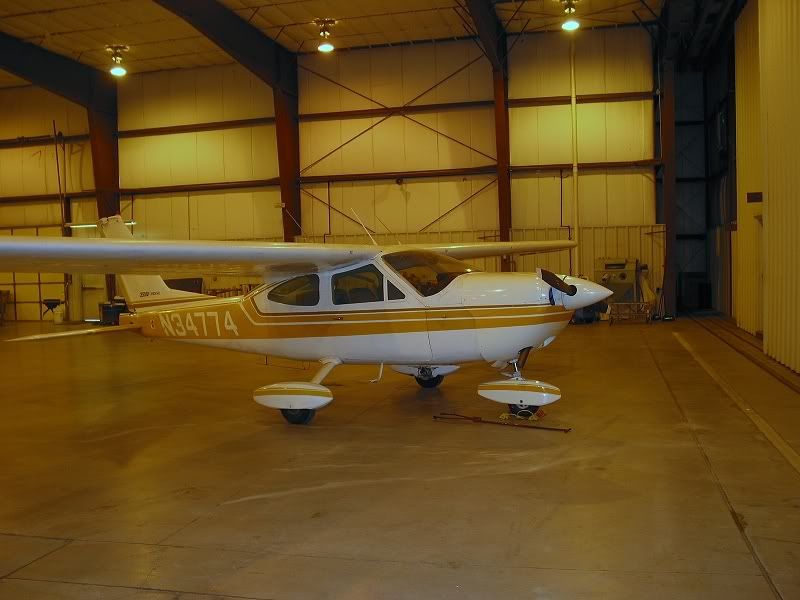
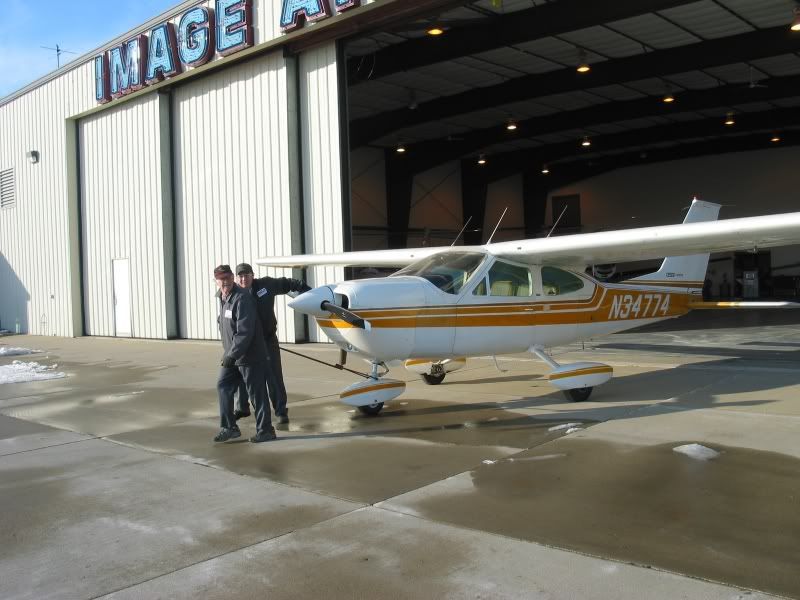 For the first time in five months, Yellowbird tastes sunlight. It was the height of summer when she entered the shop, now there's snow on the ground. I can almost imagine her squinting as she comes out of hibernation.
 We ran her up a total of three times, the longest run being about 15 minutes. The essential engine systems (Magnetos, mixture, prop) were checked, and after each run we looked her over for signs of oil leaks or any other problems. At the end of the process, she seemed in good health. All that's left to do is document everything that has been done in the logbooks, pay the bill, and wait for the next VFR day.
 In the deep mid winter, the song of the Gold Crested Yellowbird is heard for the first time. Legend has it that if she sees her shadow, she'll return to her hangar, there to await the next sunny day following the payment of large sums of money and the writing of an extensive logbook entry. Once she emerges, she'll romp about the sky in delirious joy, making all the other birds jealous.
Monday, December 10, 2007
BFR
It's due this month. My flight review, that is. Or for those who prefer the old acronym-friendly version, the Biennial Flight Review. The original plan when I started flying four years ago was to do an upgrade rating every year or so. Once I got settled into the routine of aircraft ownership, I foresaw getting my instrument rating in 2005, commercial in 2006, and CFI in 2007. I didn't have any solid career aspirations, but I felt that the challenge of pursuing advanced ratings would make the airborne life a bit more interesting. And since the upgrade checkrides would satisfy the requirements for the flight reviews, I could dispense with the trouble of grabbing an instructor for a couple of hours of ground and air time every two years. Why that is less trouble than grabbing an instructor for a few dozen hours of advanced instruction every two years is beyond me, but I'd often heard the checkride = BFR point raised as one of many reasons to pursue advanced ratings. CFI upselling, I suppose...
Things went according to plan for the first year, and I passed my IFR checkride in time to meet the requirements of my first BFR in 2005. After that, job changes, moving, job changes again, moving again, and cracked engines conspired against me, and with Yellowbird still in the shop, I went ahead and scheduled some time with one of the local CFIs.
The FBO has a couple of Diamond DA-20s for primary training as well as a DA-40 with a glass cockpit. They also have a Piper Comanche. I toyed with the idea of getting checked out in the DA-40 or getting a complex/high performance endorsement via the Comanche, but in the end I decided to just satisfy the BFR requirements in one of the DA-20s. Yesterday I picked up some study materials and a written quiz from the CFI, and last night I dug out the FAR/AIM and tried to refresh my memory concerning the relevant regulations. I also downloaded the DA-20 flight manual and spent some time sitting in the cockpit for familiarization.
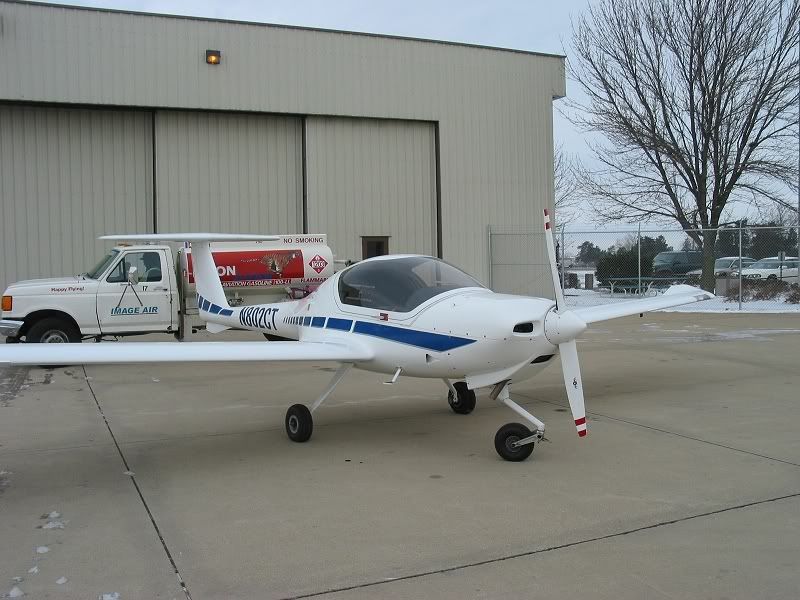 The review itself was almost anticlimactic. We chatted about regulations and safety for a while, discussed flight planning, and headed out to the plane. The DA-20 is cozy in the same way that a Cardinal is roomy. It's also a much more recent design and reflects on some of the advances in aeronautical engineering, most notably in its composite construction. The biggest difference from the pilot's perspective is that the DA-20 has a joystick instead of a yoke. Other differences include electric trim, fuel injection (meaning no need for carburetor heat), and lack of nosewheel steering. After five months on the ground, I'm not qualified to give an authoritative PIREP (here's one, here's another, and you can even buy a book), but I managed to find my way around the cockpit without too much fumbling and we were soon aloft.
It was such a novel experience to be flying again that I momentarily forgot what I was up there for and blew right through the altitude that the CFI had requested. Fortunately, he forgave me the few hundred feet transgression and after descending back to 3,000 feet, we headed out to the northwest for some basic checkride stuff - steep turns, slow flight, stalls, and a simulated emergency landing. I put the hood on and did a few unusual attitude recoveries, then we then headed back to base for some pattern work: short field, soft field, hypothetical moose on the runway, etc. After all was done, I had a little more than an hour in the logbook, and I'm now good to go in the BFR sense for the next two years.
 Meanwhile, Yellowbird awaits completion of the last few items on the annual list. Snow was starting to fall as I drove home, and the weather for the next few days looks iffy. The day will come...
Sunday, December 09, 2007
Delay, Again
We could have been airborne by now, but for one more snag. Yellowbird's IFR inspection was due last month. This inspection, which must be done every 24 months, is required for all aircraft certified for operations in instrument meteorological conditions and involves checking the altimeter and static system. Also due was the transponder inspection, which is required for all aircraft equipped with a transponder. Some of the components involved are interconnected, so it makes sense to do both inspections at the same time.
The typical encoder contains the inner workings of an altimeter, minus the dial and needle. Instead of a visual display, the altitude is encoded into a digital format which is fed to the transponder. When the transponder receives a signal from an air traffic control radar station, it replies with the encoded altitude and the four digit "squawk" code dialed into the transponder, thus providing air traffic controllers with a means of identifying specific aircraft operating at specific altitudes.
Our last IFR check was done two years ago, and concluded several months of troubleshooting various problems with the transponder. These included incorrect altitude readouts and squawk codes, and forced the cancellation of one IFR lesson when the approach controller, weary of the mixed signals we were sending hem, told us to land and not clutter his airspace again until we got our transponder fixed. The problems were eventually traced to a bad connection in the wiring harness between the encoder to the transponder, and the transponder itself, which was eventually replaced.
I wasn't expecting any problems with this year's inspection, but in light of the past five months, I should be used to disappointment. The local avionics shop began the inspection and discovered that the altitude encoder was dead.
In another case of "I wish I had taken a picture…", I wish I had taken a picture of the old encoder before it was removed. It looked just like an altimeter, except that it had no face. It was designed to fit in the instrument panel like any other instrument, but with a blank plate where the gauge would normally be visible. Yellowbird was born with a full panel so the encoder was screwed to the side of the heater duct under the panel and just above the rudder pedals.
The old encoder could have possibly been repaired, but as is often the case with old electrical equipment, the repairmen who are aged enough to remember the old ways would have to be dragged out of retirement, so it was cheaper to replace it with something more current. Thus, we'll be getting a new "solid state" encoder, perhaps connected to the new transponder by a wiring harness made of that new fangled "metal" that the young kids are talking about these days.
This is all going to take another week or so to get resolved, but after being grounded for over four months, what's another week or two? At least the engine is all set. Here are some more pictures:
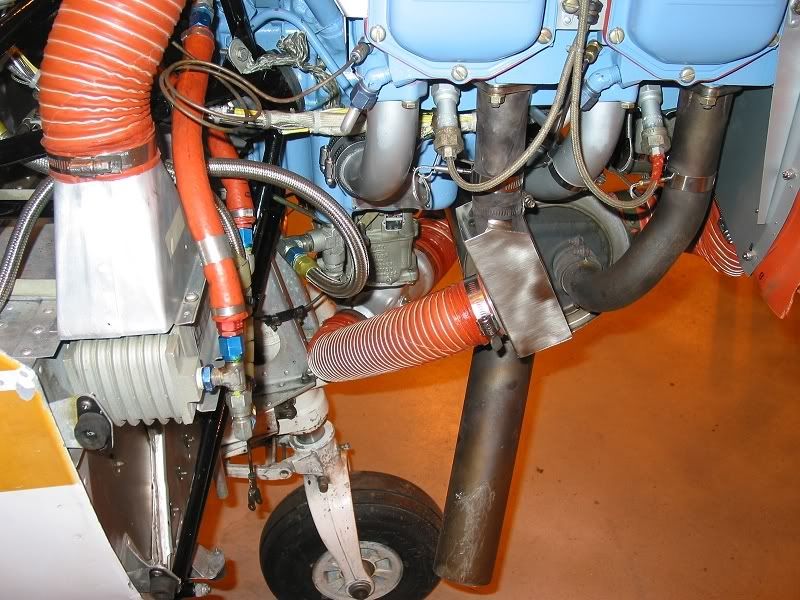
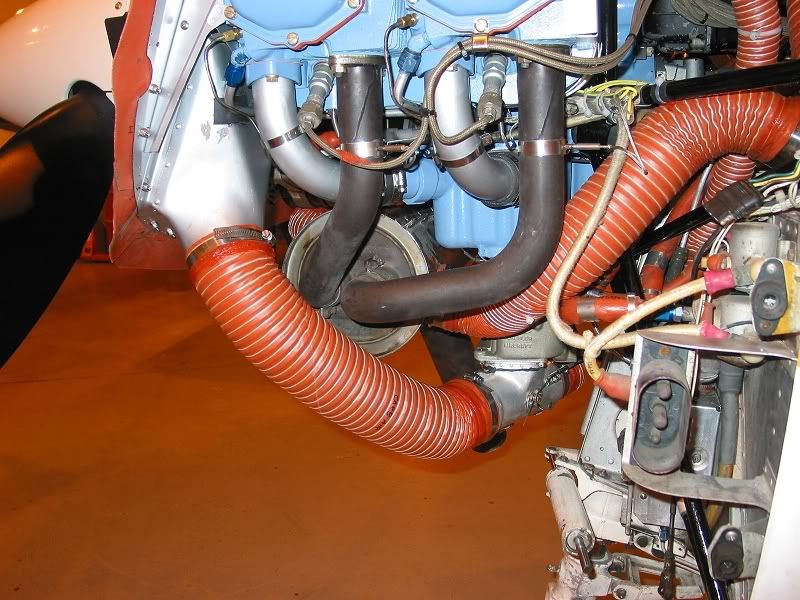 The carburetor intake duct in place, leading from the air intake in the forward baffle to the carb heat airbox below the carburetor. The old intake duct was a bit too long and tended to chafe against the inside of the lower cowl. I cut the replacement a bit shorter to prevent a recurrence.
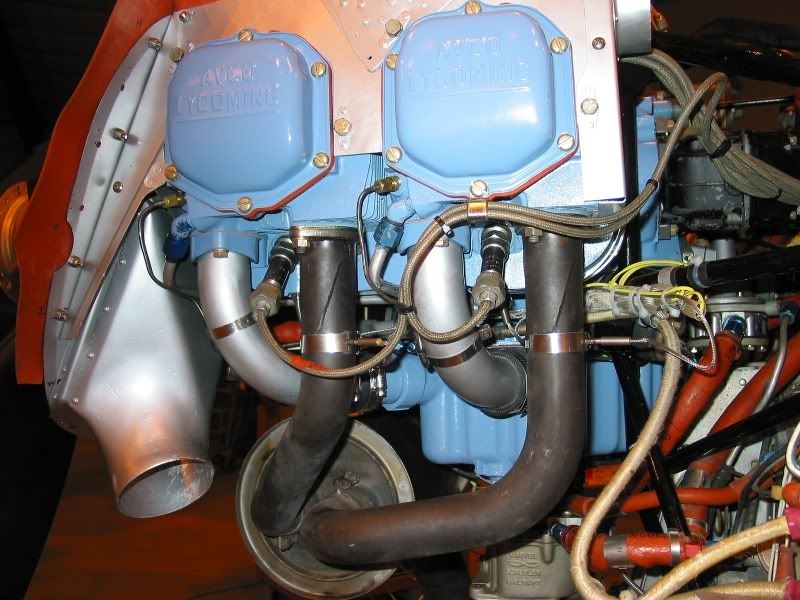
 The back of the engine with all the ducts and wires connected.
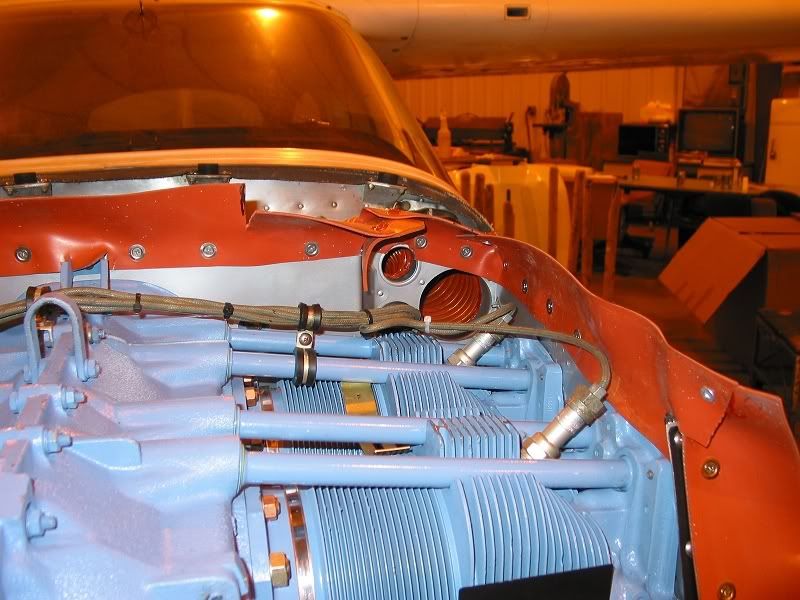 Above the cylinders. The ignition harness is tied up with cable ties and secured to a pushrod tube with a couple of Adel clamps. The intakes for the cabin fresh air and fuel strainer vent are visible in the rear baffle.
 The alternator fully installed, adjusted, and secured with a twist of safety wire. The forward baffle had been bent and required some repair, including a doubler patch near the top and a standoff bracket to prevent the baffle from chafing against the alternator fan. A sliver of dark gray baffle seal at the top prevents the baffle from chafing against the propeller oil line.
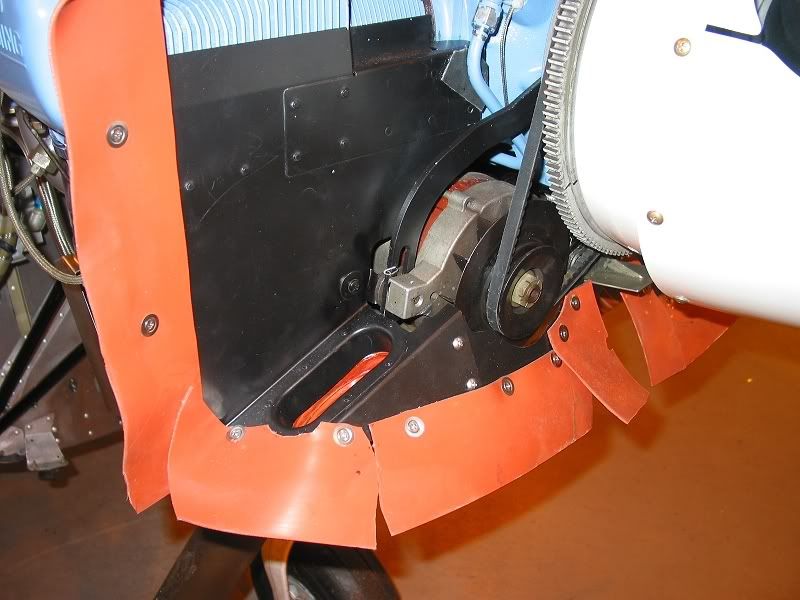
 A good shot of the alternator belt wrapping around the starter ring. One drawback to this setup is that you have to remove the propeller to change the alternator belt. I had them put on a fresh belt, didn't I? The JPI oil temperature sensor is secured with a twist of safety wire around the propeller oil line fitting.
 Why yes, that is a very shiny carb heat shroud - thanks for noticing!
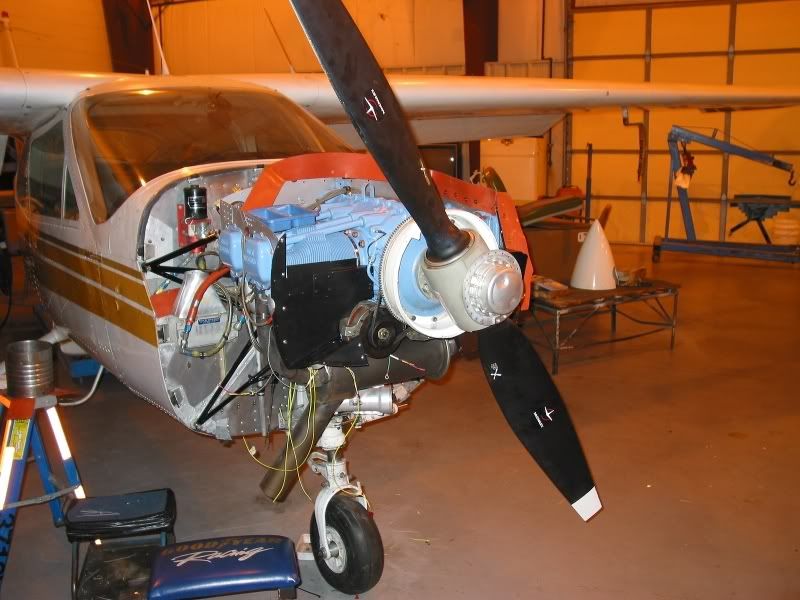
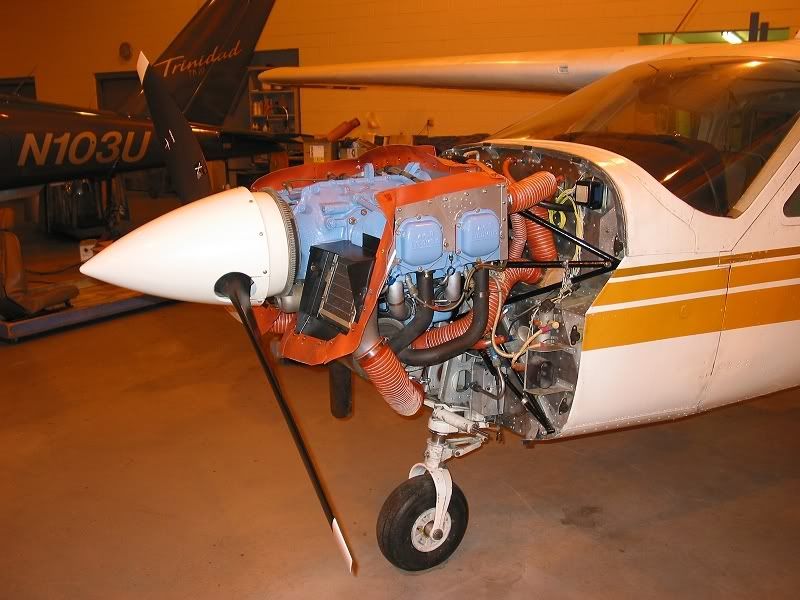 She has her nose back! And in another week or so, I hope to have my airplane back...
Thursday, December 06, 2007
Hanging the Engine: Day 3
We've reached the stage in the process where all the exciting jobs have been done. Yellowbird now has an engine, and that engine now has a carburetor, ignition system, exhaust system, and a propeller. Most of the wires and hoses have been connected and now it's just a matter of finishing up the smaller details. Of course, in an airplane every detail matters, but they don't always make for interesting photography.
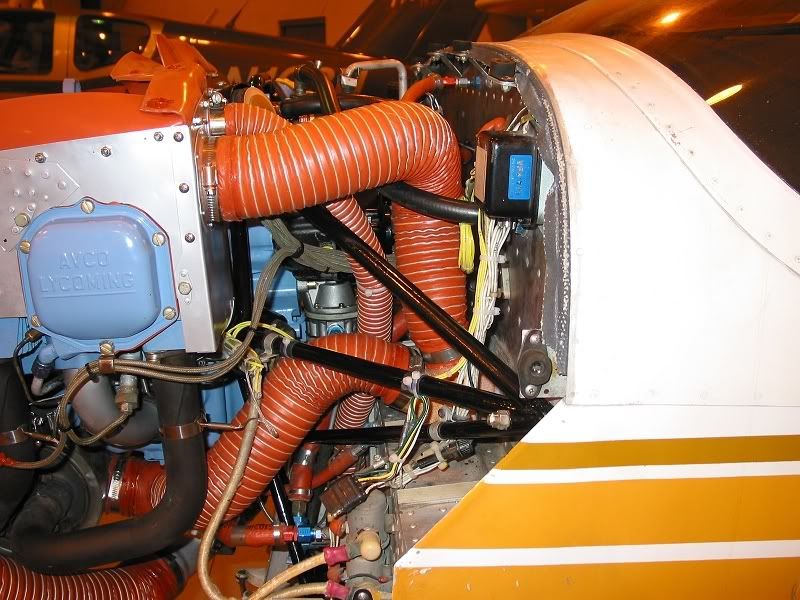
 The most notable change from yesterday is that the new SCAT ducts for cabin heat and fresh air have been connected. The upper duct takes fresh air from an intake in the baffle above cylinder #4. The lower duct takes warm air from the heater shroud around the muffler below the engine. They both lead into the heater valve on the firewall, where a flap controlled by a knob in the cockpit controls the amount of fresh and heated air.
 Up front, we see that the remainder of the orange rubber baffle seals have been installed. These provide a tight seal between the baffles and the inside of the engine cowlings. The idea is to encourage optimum airflow through the cooling fins on the cylinders.
 On the starboard side, Ray has finished the connections for the engine monitor temperature sensors and done a fine job of securing all the wires. The SCAT ducts for the oil cooler and carburetor heat have also been installed.
 Inside, the new JPI EDM-700 engine monitor takes its place in the panel where the old exhaust gas temperature gauge used to live. Ray cut two holes in the panel overlay for the monitor's programming buttons. They don't extend past the overlay, so we may have to come up with some button extensions.
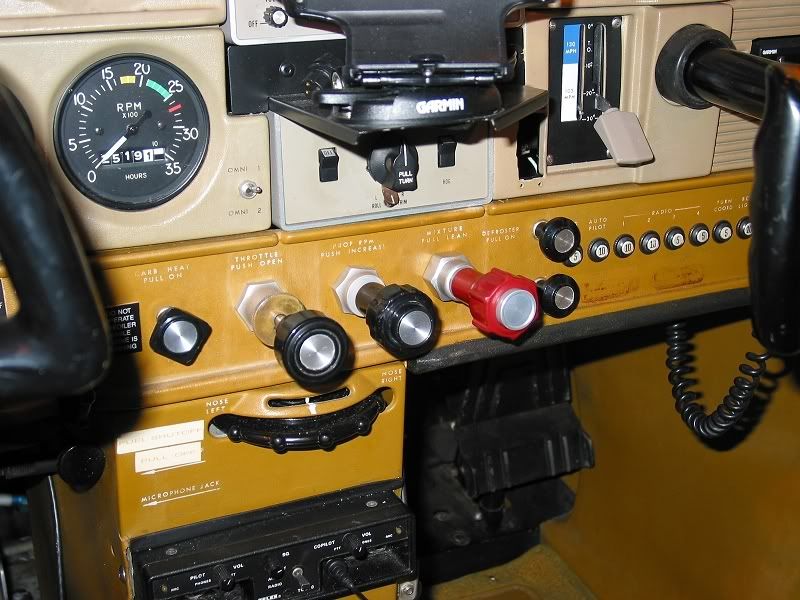 One more upgrade: I decided to replace the old push/pull mixture knob with a more precise vernier control (the large red knob). The vernier control operates just like the propeller RPM control: you twist the knob one way to increase, and the other way to decrease. In the case of the mixture, counterclockwise to lean, and clockwise to enrich. This makes it easier to make fine adjustments, and makes it less likely that you will pull the mixture to idle cutoff in-flight when you really intended to apply cabin heat. It happens, and the resulting silence is enough to ensure that you won't do it again. Well, maybe once more, but you'll learn your lesson after that.
We're getting closer. There are still some non engine issues from the annual inspection as well as the IFR check to be done. It will probably be another week before everything is finished and Yellowbird can take to the sky again.
Wednesday, December 05, 2007
Hanging the Engine: Day 2
 The hazards of having a day job: by the time I got away from work, they had already installed the propeller and exhaust system and Ray was busily wiring the various sensors for the JPI EDM-700 engine monitor. The baffle seals (the orange strips atop the engine and visible on the stool opposite Ray) are also being installed.
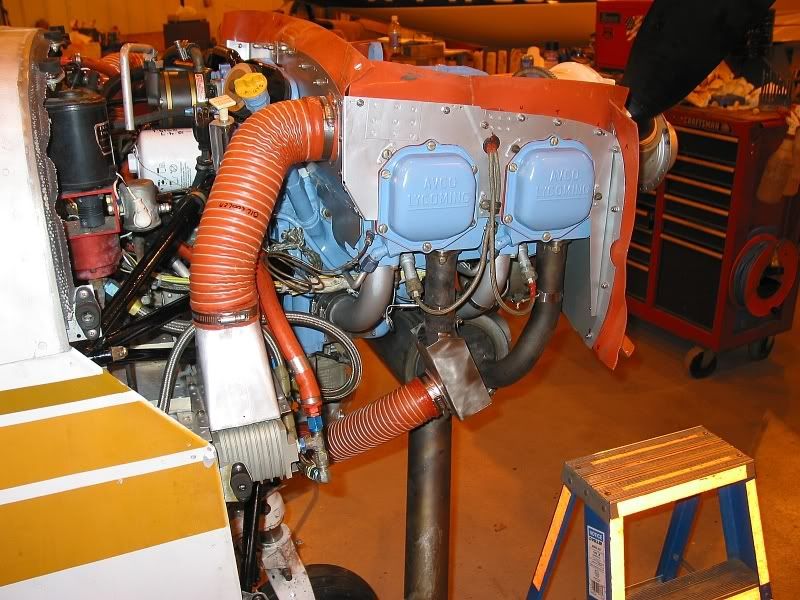
 A Ray's eye view of the proceedings. The exhaust risers can be seen extending down from each cylinder to the cylindrical muffler below the engine. The bright silver bands on the risers are the clamps for the JPI exhaust gas temperature sensors, which can be seen as short tubes extending horizontally from each clamp. Ray did a pretty tidy job on all those wires, don't you think?
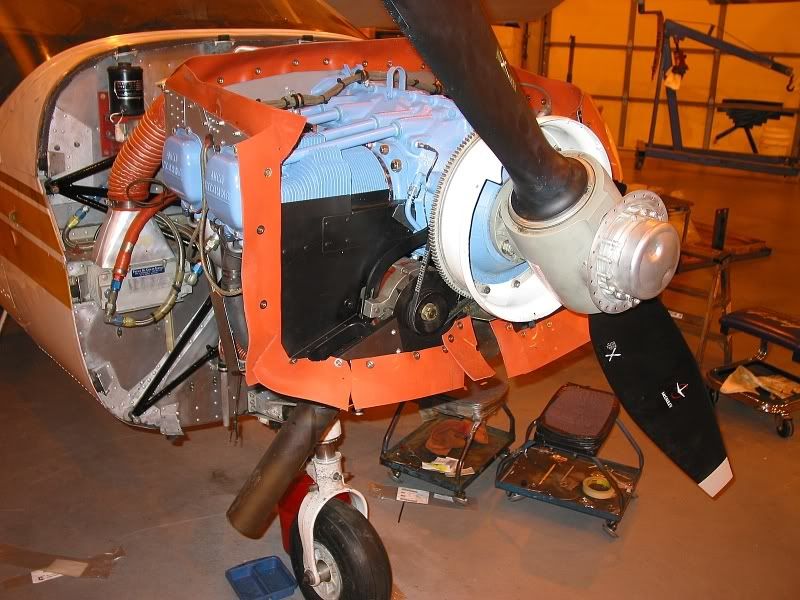
 Up front, the propeller is in place, with the nicely painted spinner bulkhead. The alternator belt can be seen wrapping around the rear of the starter gear.
 Overview of the right side, with the front baffle in place. The wires for the engine monitor have yet to be connected on this side.
 Close-up view of the front baffle. (compare to yesterday's view) The alternator bracket has been temporarily removed while the baffle is fitted into place.
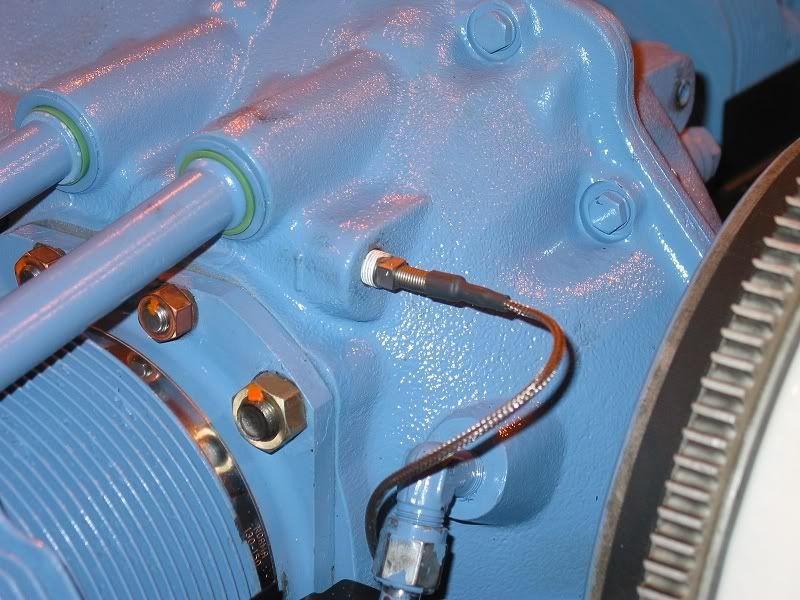 Last shot for today: this is the JPI oil temperature sensor, which threads into a hole in the front of the crankcase just above the #1 cylinder.
Tuesday, December 04, 2007
Hanging the Engine: Day 1
Today is the day. Yellowbird has found a place in the shop's schedule and it's time to start reinstalling her engine, which was removed back in August to have a cracked crankcase fixed. The engine arrived about a month ago, but the shop was booked solid with other aircraft until now. Shall we watch?
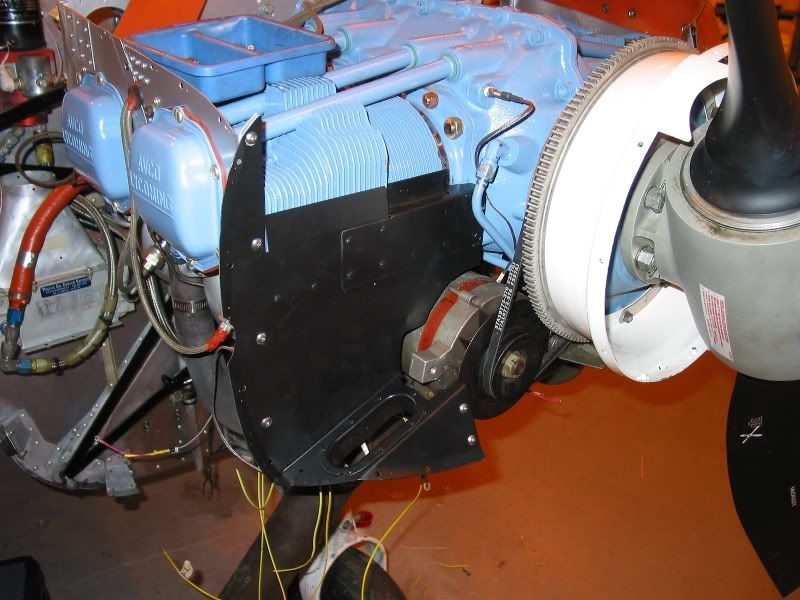
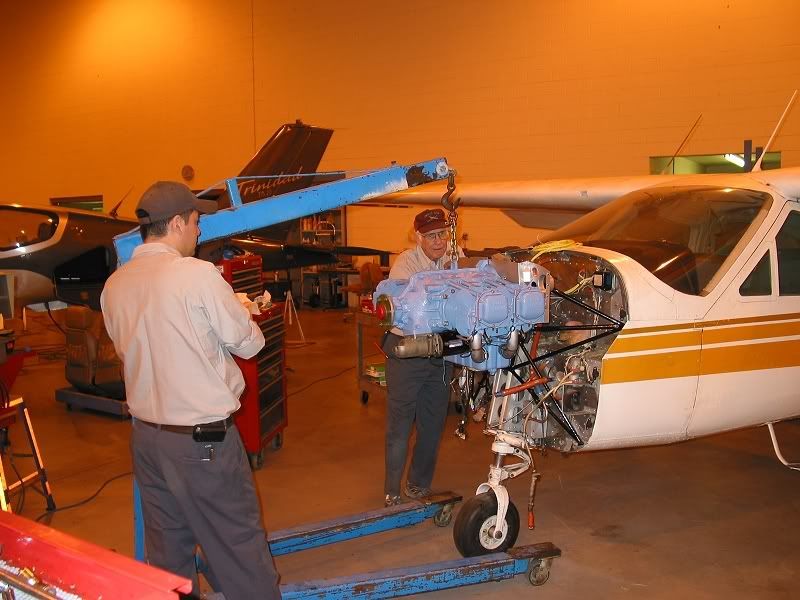 Aloft again, the engine is finally mated to its mount. We got new rubber shock mounts all around. They're not cheap, but it made sense to replace them while the engine was off. The magnetos have been temporarily removed to provide better clearance around the engine mount. The rear baffles were installed before hanging the engine.
 Together at last. Now begins the long task of installing various engine accessories (carburetor, exhaust, alternator, magnetos, vacuum pump, propeller and governor) as well as all of the fuel and oil lines, electrical connections, and control cables.
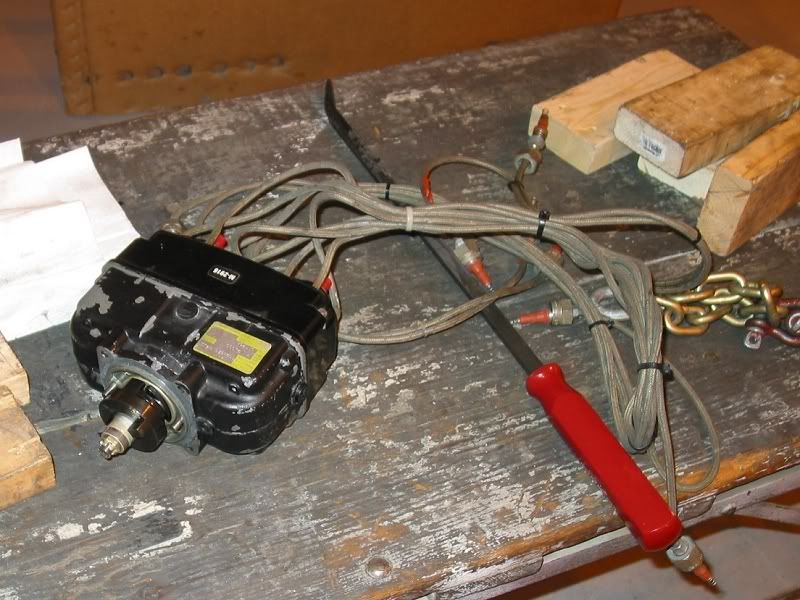 Set aside for the moment, the dual magneto and ignition leads.
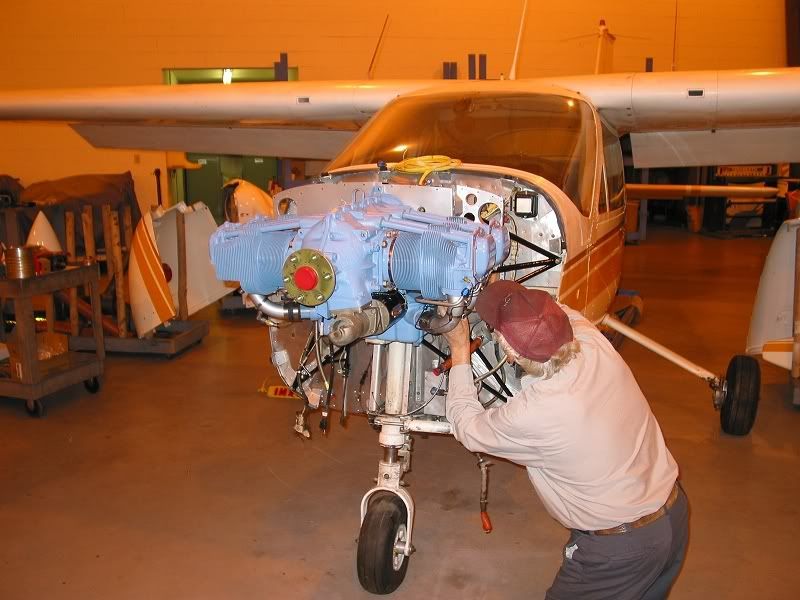
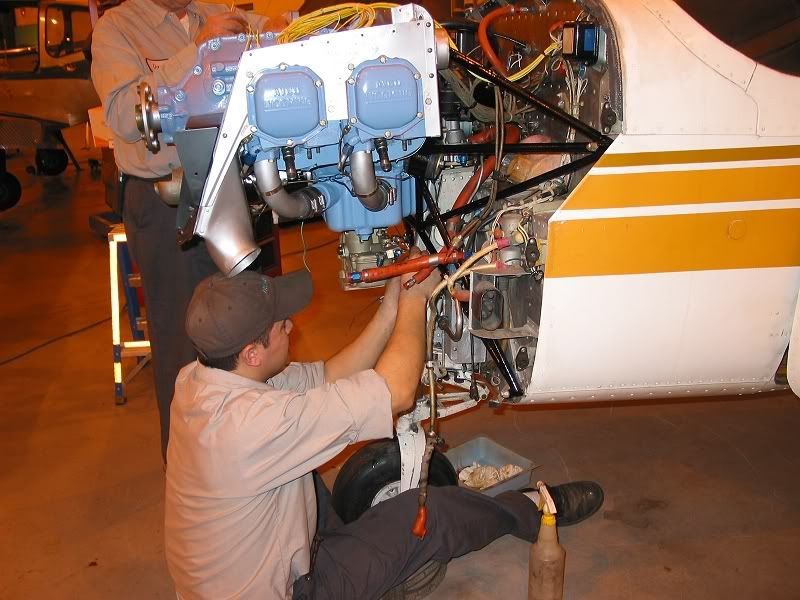 Progressing along, Ray hooks up the carburetor. The red hoses in front of his hands are fuel lines. The wire with a red connector hanging down by his knee is the starter power cable. The cylinder side baffles and the forward baffle incorporating the carburetor air intake have been installed, but the baffle seals will probably go on after everything else has been completed.
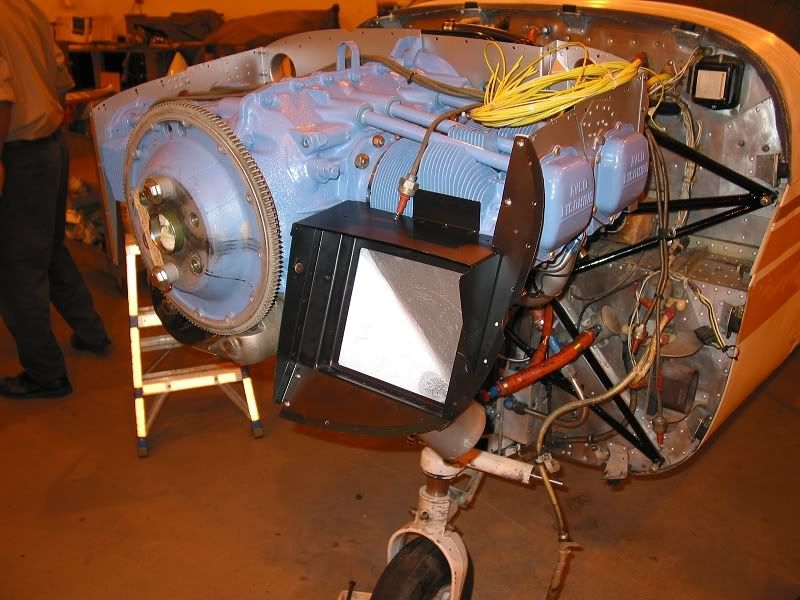 The carburetor air intake and starter ring in place. The air filter will eventually fill the square opening in the intake. The magnetos have been installed, evidenced by the ignition leads which can be seen atop the engine. The bundle of yellow wire is the harness for the JPI CHT and EGT sensors.
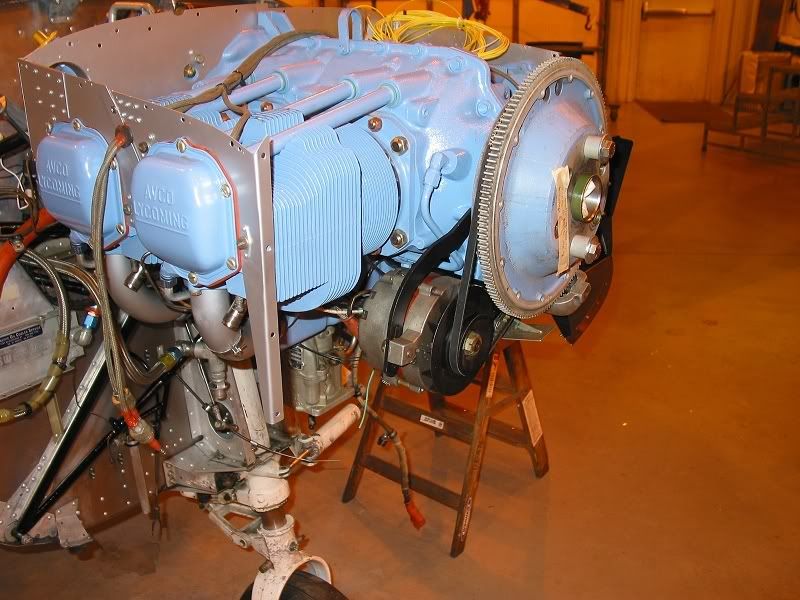 The alternator all snug in its bracket. The alternator belt goes around a groove in the back of the starter ring, which is held on by temporary bolts and spacers until the propeller is installed. The ignition leads to the bottom spark plugs for cylinders 1 and 3 can be seen as they feed through a rubber grommet in the baffles between the two cylinders. The forward baffle on this side is yet to be installed.
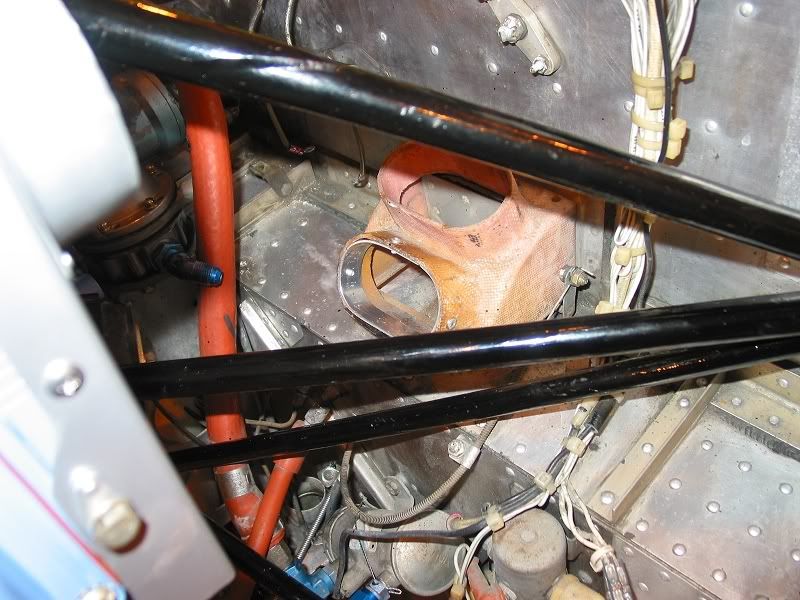 I wish I had taken a better picture of this before the engine was hung. This is the cabin heat valve attached to the firewall. The upper opening admits fresh air ducted from an intake in the rear baffles above cylinder #4. The lower opening admits heated air from the muffler shroud. A flap inside the valve directs either fresh or heated air (or a combination of the two) into the heater manifold inside the cabin. You can see an aluminum strip inside the lower opening - this is Ray's tidy repair to the flange, which had been warped thanks to a combination of heat and overtightening of the clamp which held the SCAT duct to the valve. Prior to his repair, it looked like this.
Well that's it for today. This morning Yellowbird was a hulk, devoid of her heart. Now she's starting to look like an airplane again. We'll come back tomorrow to watch the revival continue.
